Every dataset you work with in Excel will need structural changes at some point. A column gets left out during setup. A new employee joins the team mid-project. A sheet that made sense in January no longer fits by March. Knowing how to insert and delete rows, columns, and sheets cleanly — without breaking formulas or losing data — is one of the most practical skills in Excel.
The mechanics are simple. The consequences, if you get them wrong, are not. Delete a row that a formula references somewhere else in the workbook and you’ll get a cascade of #REF! errors. Delete a sheet without realising it’s permanent and the data is gone. This lesson covers the techniques correctly, the shortcuts worth memorising, and the specific warnings that protect you from the mistakes that can’t be undone.
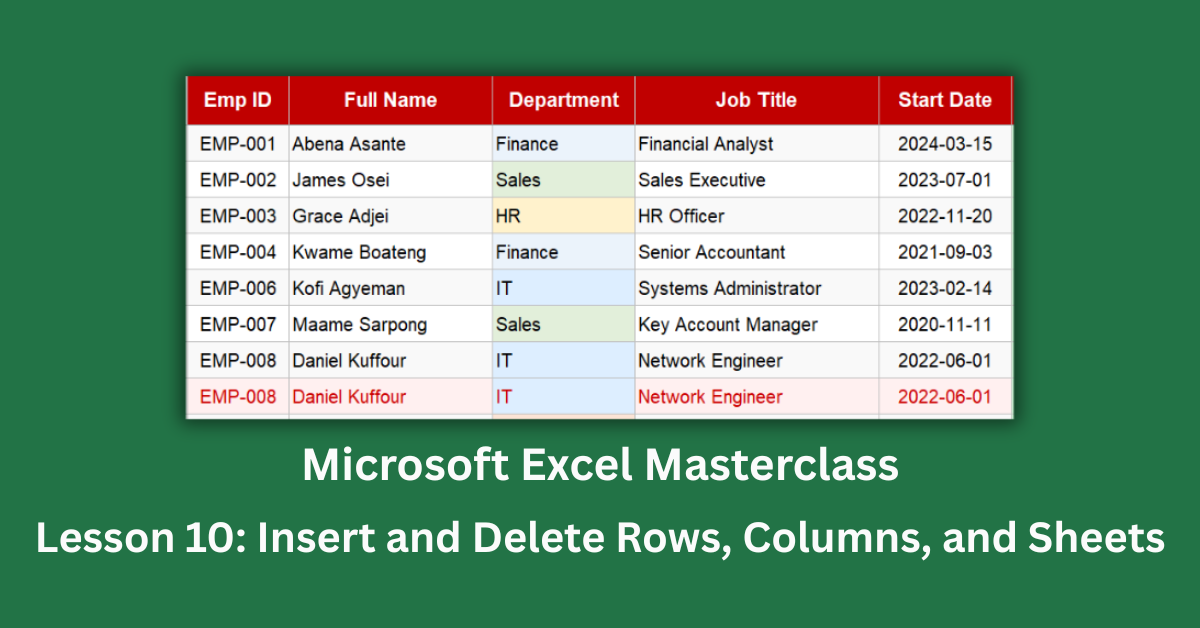
All examples come from a 20-employee staff register dataset, which contains intentional structural problems: two missing rows, a duplicate row, two missing columns, and a missing sheet tab — each one a realistic version of what goes wrong in real workbooks.
Quick Takeaways:
- A new row always inserts above the selected row. A new column always inserts to the left of the selected column. Select the right position before inserting.
- To insert multiple rows or columns at once, select exactly that many first. Select three rows, right-click, Insert — and three blank rows appear. One at a time is always slower.
- Keyboard shortcut for inserting: Ctrl + Shift + +. For deleting: Ctrl + -. These work for rows, columns, and cells.
- Deleting a worksheet cannot be undone. Excel shows a warning, but once you confirm, the sheet and all its data are permanently gone.
- Deleting a row that other formulas reference creates #REF! errors. Check cross-sheet and cross-range references before deleting any structural element.
How to Insert Rows in Excel
The fastest way to insert a row is to right-click the row number on the left side of the screen and choose Insert. The new blank row appears immediately above the row you clicked.
Inserting a Single Row
In the staff register, EMP-005 is missing. The sequence jumps from EMP-004 (Kwame Boateng) straight to EMP-006 (Kofi Agyeman). To fix this, click the row number for the EMP-006 row, right-click, and choose Insert. A blank row appears above EMP-006. Type the missing employee’s data into that row and the sequence is restored.
The keyboard shortcut for the same action is Ctrl + Shift + + (plus key). Select the row first, then press the shortcut. Excel inserts a blank row above without requiring a right-click.
Inserting Multiple Rows at Once
When you need more than one row, selecting the right number first is the key step. Suppose you need to insert three rows at position 10. Click row 10, hold Shift, click row 12 — three rows are now selected. Right-click any of the selected row numbers and choose Insert. Three blank rows appear at once, above the selection.
The same logic applies to the keyboard shortcut. Select three rows, press Ctrl + Shift + +, and three rows insert. Doing it one at a time is possible but inefficient for anything beyond two or three rows.
Where Excel Inserts — and Why It Matters
New rows insert above the selected row, always. If you want a row between row 7 and row 8, select row 8 and insert. The new blank row becomes the new row 8 and the original row 8 shifts down to row 9.
This direction is worth committing to memory. I’ve seen people select the wrong row, insert, and end up with the new row in the wrong place. Always select the row that will move down to make room, not the row above it.
How to Delete Rows in Excel
Right-click any row number and choose Delete. The row disappears and everything below shifts up automatically. Row numbers update to reflect the new structure.
Deleting a Single Row
The staff register has a duplicate. EMP-008 (Daniel Kuffour) appears twice with identical data on consecutive rows. To remove the duplicate, right-click its row number and choose Delete. One click, one row gone.
The keyboard shortcut is Ctrl + – (minus key). Select the row, press Ctrl + -, and it’s deleted immediately.
Before You Delete — Check for References
Here’s the warning that matters most. If any formula elsewhere in the workbook references the row you’re about to delete, deleting it will replace those references with a #REF! error. The formula doesn’t gracefully remove the row from its calculation. It breaks.
Before deleting any row, use Ctrl + F to search for the row’s key identifier — an employee ID, a date, or a row number — across the workbook. If it appears in a formula on another sheet, decide whether to update the formula first or restructure your approach.
Microsoft’s guidance on avoiding broken references explains what triggers #REF! errors and how to correct them when they occur.
How to Insert and Delete Columns
Columns follow the same pattern as rows, with one direction change. New columns insert to the left of the selected column. Deleted columns shift remaining columns to the left.
Adding the Missing Columns
The staff register is missing two columns: Phone and Annual Salary. Both should sit after the Email column (column H). To insert them, click the column letter that should move right to make room — in this case, whatever column follows Email — right-click it, and choose Insert. A blank column appears to its left. Repeat for the second column.
For the keyboard shortcut, select the column letter and press Ctrl + Shift + +. Same shortcut as rows — Excel knows whether you’ve selected a row or a column and inserts accordingly.
Column Order and Data Integrity
When you insert a column, all formulas that use relative column references adjust automatically. A formula referencing column H moves its reference to column I after you insert a new column H. That’s usually the correct behaviour.
Watch out for formulas that use absolute column references (locked with a $ sign) or that reference a specific column letter as a text string in functions like INDIRECT or ADDRESS. Those won’t adjust automatically and may need manual updating after structural changes.
Contextures has a practical guide to working with column references that covers how to handle reference adjustments after inserting or deleting columns.
How to Insert and Delete Worksheets
Sheets are where the real power of structural organisation comes from. A workbook that started as one sheet often grows into three or four over the course of a project — one for raw data, one for analysis, one for summaries, one for the current period’s work.
Inserting a New Sheet
The fastest method is the plus icon at the bottom of the screen, next to the last sheet tab. Click it and a new blank sheet appears to the right of the current tab.
For keyboard users, Shift + F11 inserts a new sheet instantly, placing it to the left of the current tab. The new sheet gets a default name like Sheet2 or Sheet3.
Right-clicking any existing tab and choosing Insert gives you slightly more options — including inserting from a template rather than a blank sheet, which is useful when you’re setting up recurring monthly reports with a consistent structure.
In the practice file, the Q2 Review sheet represents the tab students need to create. Once inserted, you rename it by double-clicking the tab and typing the new name. The sheet is immediately referenced in formulas using the new name, so rename before you build any cross-sheet references.
Deleting a Sheet — The One Action You Can’t Undo
This deserves its own section because the rule is different from everything else in Excel.
Deleting a worksheet is permanent. There is no Ctrl + Z for sheet deletion. Excel shows a warning prompt before removing the sheet, but if you click OK and the sheet is gone, you cannot get it back unless you have a saved backup or a previous version in OneDrive or SharePoint.
Right-click any tab and choose Delete to trigger the process. Read the warning carefully. If the sheet contains any data at all, Excel will tell you explicitly. If you proceed, act as though the data no longer exists — because it doesn’t.
The practical implication: before deleting any sheet, either verify it’s genuinely empty or move its contents to another location first. I’ve found that treating sheet deletion with the same caution as emptying a bin is the right mental model. Once it’s gone, it’s gone.
Moving and Copying Sheets
You can reorder sheets by clicking and dragging a tab to a new position. Hold Ctrl while dragging to copy the sheet rather than move it — a duplicate of the tab appears at the destination, named with “(2)” appended.
To move or copy a sheet between two different workbooks, right-click the tab, choose Move or Copy, and select the destination workbook from the dropdown. This is more reliable than dragging between open files, especially when both workbooks have many sheets.
A Few Habits That Prevent Structural Mistakes
Always select the correct reference point before inserting. New rows go above. New columns go to the left. Confirm that before you right-click.
Select N items to insert N items. This saves time and keeps insertions clean.
Rename every sheet immediately after creating it. Sheet2, Sheet3, Sheet4 become impossible to track quickly. Thirty seconds of renaming saves hours of confusion later.
Never delete a sheet without checking whether any formula references it. Use Ctrl + F across the workbook, searching for the sheet name followed by an exclamation mark (the cross-sheet reference syntax). If it appears in a formula, update that formula before deleting.
Open the Before sheet in the practice file and work through all five structural fixes in order — insert EMP-005, insert EMP-011, delete the duplicate EMP-008, add the Phone and Salary columns, and create the Q2 Review sheet. Compare your result to the After sheet when done.